DevOps
Terraform: IaC의 단짝
2021년 7월 5일
원문에서 보기 ↗목차
- Terraform과 IaC
- Terraform 설치
- 준비
- 인프라 구축
- 인프라 변경
- 인프라 제거
- 그래프
개요
훌륭한 IaC(Infrastructure as Code) 도구인 Terraform을 사용하여 NHN Cloud의 리소스(서버 인스턴스 등)를 만들고 변경하고 제거하는 예제를 정리해보았습니다.
본문에서는 Terraform의 핵심적인 내용만 간단히 언급하기에 상세한 내용은 Terraform 문서를 참고하면 상세한 내용을 확인할 수 있습니다.
예제의 관련 파일들은 GitHub에 있으니 참고 부탁드립니다.
NHN Cloud의 Terraform 연동 관련해서는 Terraform 사용 가이드에 자세히 설명되어 있기 때문에 참고 부탁드립니다.
Terraform과 IaC
Terraform은 HashiCorp라는 매우 훌륭한 회사에서 개발되어 제공되는 아주 훌륭한 IaC 도구입니다. 안전하고 반복 가능한 방식으로 인프라를 구축, 변경 및 관리할 수 있는 도구입니다. 이 외에도 이미지 도구인 Packer, 개발환경을 쉽게 구성할 수 있게 해주는 Vagrant, Secrets 관리 도구인 Vault、Service mesh 도구 Consul 등등이 있습니다.
작업의 흐름(Workflows)
Terraform을 사용한 IaC는 코드를 작성하고 변경을 확인하고 적용하는 3개의 단계로 이뤄집니다.
- Write - 인프라를 코드로 작성
- Plan - 반영하기(applying) 전에 변경을 확인
- Apply - 변경 내용을 적용
State
초기화(Initialize)를 하면 state file을 생성합니다. Terraform 은 이 state를 기준으로 plans을 생성하고 인프라를 변경합니다. 즉, 작업 전 어떤 변경이 일어날지 판단하는 기준이 됩니다. 마치 CMDB의 역할을 담당한다고 볼 수 있습니다.
이 중요한 state file은 local state 또는 remote state로 저장 및 관리할 수 있습니다. 기본적으로는 terraform으로 작업을 수행하는 머신에 저장되는 local state가 사용되지만 Team 단위로 Terraform을 사용한다면 원격 저장소에 state file을 업데이트하는 remote state를 사용하는 편이 유익할 수 있습니다.
Terraform 설치
Download 페이지에서 OS, 아키텍처에 맞는 것을 다운로드하고 압축을 해제하면 바로 사용할 수 있습니다.
Terraform은 Go 언어로 작성되었고 배포되는 바이너리는 정적 컴파일(statically-compiled)된 바이너리입니다. 그래서 별도의 라이브러리 의존성이 없지만 용량은 좀 큰 편입니다.
제 로컬 환경은 Debian Linux라 본문의 예제는 Linux 64-bit의 것을 사용했습니다.
$ terraform version
Terraform v1.0.0
on linux_amd64
준비
NHN Cloud는 OpenStack의 API를 사용해야 하기 때문에 terraform-provider-openstack/openstack라는 provider를 사용해야 합니다. (terraform 버전 0.13부터 변경되었습니다.)
먼저 예제 파일을 clone 합니다.
$ git clone https://github.com/foobargem/terraform-nhncloud-example.git
Cloning into 'terraform-nhncloud-example'...
remote: Enumerating objects: 5, done.
remote: Counting objects: 100% (5/5), done.
remote: Compressing objects: 100% (4/4), done.
remote: Total 5 (delta 0), reused 0 (delta 0), pack-reused 0
Unpacking objects: 100% (5/5), done.
| 파일명 | 설명 |
|---|---|
| backend.hcl | remote state를 위한 backend storage 관련 정의. 초기화(init) 할 때 필요 |
| provider.tf | terraform이 사용할 provider 정보(인증정보, 리전 정보 등) 정의 |
| var.tf | 외부 변수 파일로 변수를 읽어 들이기 위한 타입 정의 |
| data.tf | 인프라 제어에 필요한 프로젝트의 리소스 정보(VPC, Security group, Image 등)를 조회하기 위한 정의 |
| resource.tf | 리소스 정의 (예제에선 network port와 server instance의 정의) |
| example.tfvars | 변수 파일 |
terraform 정의
- backend.hcl
remote로 state를 관리하기 위한 설정입니다. terraform init 을 수행할 때 별도로 속성 값을 전달하기 위해 빈 블록으로 작성했습니다. 이유는 코드에 고정된 값을 최대한 사용하지 않으며 민감한 정보를 가능한 숨기기 위해서입니다.
backend.hcl.example 파일을 backend.hcl 로 복사를 한 뒤 프로젝트 정보에 맞게 backend 관련 속성을 기술합니다.
region_name = "{KR1,KR2,JP1,US1}"
auth_url    = "https://api-identity.infrastructure.cloud.toast.com/v2.0"
tenant_id   = "<tenant_id_of_object_storage_api_endpoint>"
user_name   = "<user_email>"
password    = "<password_of_object_storage_api_endpoint>"
container   = "tfstate.d"
- provider.tf
openstack provider를 사용하기 위한 설정입니다. web console의 Compute > Instance > 관리 화면의 API 엔드포인트를 참고하여 정의합니다. 예제에서는 외부 변수를 통해 정의하도록 선언했습니다.
tfvars 선언과 사용
Terraform 은 외부로부터 변숫값을 입력받아 리소스 구성을 동적으로 할 수 있습니다. 변경이 발생할 수 있는 provider 속성과 서버 인스턴스의 구성 정보는 변수로 정의하여 tf 파일들은 가능한 변경이 발생 안 되도록 할 수 있습니다.
foo.tfvars.example 을 foo.tfvars 로 복사하여 프로젝트 환경에 맞게 적절하게 정의를 합니다.
provider_openstack = {
  region    = "{KR1,KR2,JP1,US1}"
  auth_url  = "https://api-identity.infrastructure.cloud.toast.com/v2.0"
  tenant_id = "<tenant_id_of_compute_api_endpoint>"
  user_name = "user_email"
  password  = "<password_of_compute_api_endpoint>"
}

machines = [
  {
    name              = "consul-serv01"
    availability_zone = "kr-pub-a"
    flavor_name       = "t2.c1m1"
    key_pair          = "keypair_name"
  },
]
plan이나 apply를 할 때 -var-file 옵션에 tfvars 파일을 명시해주면 var.tf 파일에 정의된 provider_openstack(map), machines(list) 변수에 값이 할당되어 tf 파일에서 참조를 할 수 있습니다.
초기화
여기까지 했으면 다음과 같이 초기화를 실행할 수 있습니다.
$ terraform init -backend-config=backend.hcl

Initializing the backend...

Successfully configured the backend "swift"! Terraform will automatically
use this backend unless the backend configuration changes.

Initializing provider plugins...
- Finding terraform-provider-openstack/openstack versions matching "~> 1.42.0"...
- Installing terraform-provider-openstack/openstack v1.42.0...
- Installed terraform-provider-openstack/openstack v1.42.0 (self-signed, key ID 4F80527A391BEFD2)

Partner and community providers are signed by their developers.
If you'd like to know more about provider signing, you can read about it here:
https://www.terraform.io/docs/cli/plugins/signing.html

Terraform has created a lock file .terraform.lock.hcl to record the provider
selections it made above. Include this file in your version control repository
so that Terraform can guarantee to make the same selections by default when
you run "terraform init" in the future.

Terraform has been successfully initialized!

You may now begin working with Terraform. Try running "terraform plan" to see
any changes that are required for your infrastructure. All Terraform commands
should now work.

If you ever set or change modules or backend configuration for Terraform,
rerun this command to reinitialize your working directory. If you forget, other
commands will detect it and remind you to do so if necessary.
init이 완료되면 Object Storage에 tfstate.d 컨테이너가 생성된 것을 확인할 수 있습니다.
terraform providers 명령으로 provider의 구성 정보를 확인해 볼 수 있습니다.
$ terraform providers

Providers required by configuration:
.
└── provider[registry.terraform.io/terraform-provider-openstack/openstack] ~> 1.42.0
workspace
Terraform에서 workspace를 분리하여 인프라를 관리할 수 있습니다. 기본은 default workspace이고, foo라는 workspace를 만들어 보겠습니다. remote state file은 tfstate.d/env-${terraform.workspace}/tfstate.tf 로 저장이 되기 때문에 workspace를 활용하면 작성한 tf 코드를 쉽게 재사용할 수 있습니다.
$ terraform workspace list
* default

$ terraform workspace new foo
Created and switched to workspace "foo"!

You're now on a new, empty workspace. Workspaces isolate their state,
so if you run "terraform plan" Terraform will not see any existing state
for this configuration.
이제 Object Storage를 확인해보면 env-foo 컨테이너에 tfstate.tf 오브젝트가 생성된 것을 확인할 수 있습니다.
인프라 구축
이제 실제 서버 인스턴스를 생성해보겠습니다. 서버 인스턴스를 만들기 위해서 필요한 요소들이 있습니다. 그 요소들의 정보를 provider를 통해 얻어오는 것이 data입니다. 그리고 실제 리소스를 만드는 것이 resource입니다.
예제의 data.tf 에 기술된 정보는 예제를 실행하는 시기나 프로젝트에 따라 다를 수 있습니다.
plan을 실행해 보겠습니다.
$ terraform plan -var-file=foo.tfvars

Terraform used the selected providers to generate the following execution plan. Resource actions are indicated with
the following symbols:
  + create

Terraform will perform the following actions:

  # openstack_compute_instance_v2.vm[0] will be created
  ...(생략)

Plan: 2 to add, 0 to change, 0 to destroy.

───────────────────────────────────────────────────────────────────────────────────────────────────────────────────

Note: You didn't use the -out option to save this plan, so Terraform can't guarantee to take exactly these actions
if you run "terraform apply" now.
2개를 add 할 계획이라고 알려줍니다. 바로 apply 해보겠습니다.
$ terraform apply -var-file=foo.tfvars

Terraform used the selected providers to generate the following execution plan. Resource actions are indicated with
the following symbols:
  + create

Terraform will perform the following actions:

  # openstack_compute_instance_v2.vm[0] will be created
  ...(생략)

Plan: 2 to add, 0 to change, 0 to destroy.

Do you want to perform these actions in workspace "foo"?
  Terraform will perform the actions described above.
  Only 'yes' will be accepted to approve.

  Enter a value: yes

openstack_networking_port_v2.nic[0]: Creating...
openstack_networking_port_v2.nic[0]: Creation complete after 8s [id=954a7a43-3454-4583-897d-e63a0ff7c1f9]
openstack_compute_instance_v2.vm[0]: Creating...
openstack_compute_instance_v2.vm[0]: Still creating... [10s elapsed]
openstack_compute_instance_v2.vm[0]: Still creating... [20s elapsed]
openstack_compute_instance_v2.vm[0]: Still creating... [30s elapsed]
openstack_compute_instance_v2.vm[0]: Still creating... [40s elapsed]
openstack_compute_instance_v2.vm[0]: Still creating... [50s elapsed]
openstack_compute_instance_v2.vm[0]: Still creating... [1m0s elapsed]
openstack_compute_instance_v2.vm[0]: Creation complete after 1m3s [id=bceec37b-b5f3-481f-b5fb-d30767f824d8]

Apply complete! Resources: 2 added, 0 changed, 0 destroyed.
apply 할 때 기본적으로 실행 여부를 물어보도록 되어있습니다. workspace 정보와 plan 내용을 확인 후 이상이 없으면 yes를 입력합니다. 물론 -auto-approve 옵션을 사용하면 건너뛸 수 있습니다.
생성된 리소스 중 하나는 consul-serv01 이란 이름의 서버 인스턴스이고 다른 하나는 그 서버 인스턴스가 사용하는 network interface(port)입니다. 그리고 이 리소스 정보는 remote state에 저장됩니다.
terraform show 명령을 통해서 전체 리소스 정보를 확인할 수 있습니다.
$ terraform show
...(생략)
# openstack_compute_instance_v2.vm[0]:
resource "openstack_compute_instance_v2" "vm" {
    access_ip_v4        = "192.168.0.20"
    all_metadata        = {
        "description"      = "Debian 10.7 Buster (2020.12.22)"
        "hypervisor_type"  = "qemu"
        "image_name"       = "Debian 10.7 Buster (2020.12.22)"
        "login_username"   = "debian"
        "monitoring_agent" = "sysmon"
...(생략)
terraform state list 명령을 사용하면 개별 리소스 주소 목록을 확인하여 리소스 단위의 조회가 가능합니다.
$ terraform state list
data.openstack_images_image_v2.img_debian10
data.openstack_networking_network_v2.vpc
data.openstack_networking_secgroup_v2.sg
data.openstack_networking_subnet_v2.subnet
openstack_compute_instance_v2.vm[0]
openstack_networking_port_v2.nic[0]
terraform state show <리소스 주소> 명령으로 개별 리소스를 확인할 수 있습니다.
$ terraform state show 'openstack_compute_instance_v2.vm[0]'

# openstack_compute_instance_v2.vm[0]:
resource "openstack_compute_instance_v2" "vm" {
    access_ip_v4        = "192.168.0.20"
    all_metadata        = {
        "description"      = "Debian 10.7 Buster (2020.12.22)"
        "hypervisor_type"  = "qemu"
        "image_name"       = "Debian 10.7 Buster (2020.12.22)"
        "login_username"   = "debian"
        "monitoring_agent" = "sysmon"
...(생략)
인프라 변경
현재 consul-serv01이라는 서버 인스턴스가 1대 있는 상황에서 consul-serv02라는 이름의 서버 인스턴스 1대를 추가해 보겠습니다.
foo.tfvars 파일의 machines 에 항목을 추가합니다.
machines = [
  {
    name              = "consul-serv01"
    availability_zone = "kr-pub-a"
    flavor_name       = "t2.c1m1"
    key_pair          = "jp-system"
  },
+ {
+   name              = "consul-serv02"
+   availability_zone = "kr-pub-b"
+   flavor_name       = "t2.c1m1"
+   key_pair          = "jp-system"
+ },
]
그리고 다시 plan을 실행합니다.
$ terraform plan -var-file=foo.tfvars
openstack_networking_port_v2.nic[0]: Refreshing state... [id=954a7a43-3454-4583-897d-e63a0ff7c1f9]
openstack_compute_instance_v2.vm[0]: Refreshing state... [id=bceec37b-b5f3-481f-b5fb-d30767f824d8]

Terraform used the selected providers to generate the following execution plan. Resource actions are indicated with
the following symbols:
  + create

Terraform will perform the following actions:

  # openstack_compute_instance_v2.vm[1] will be created
  ...(생략)

Plan: 2 to add, 0 to change, 0 to destroy.

───────────────────────────────────────────────────────────────────────────────────────────────────────────────────

Note: You didn't use the -out option to save this plan, so Terraform can't guarantee to take exactly these actions
if you run "terraform apply" now.
plan이나 apply를 수행하기 전에 state file의 내용을 비교하여 변경 정보를 알려줍니다. 이 경우는 2개의 리소스가 추가된다고 알려주고 있습니다.
다음 명령으로 apply를 실행합니다. terraform apply -var-file=foo.tfvars
state list 정보를 확인해 보면 2개의 리소스가 늘어난 것을 확인할 수 있습니다.
$ terraform state list
data.openstack_images_image_v2.img_debian10
data.openstack_networking_network_v2.vpc
data.openstack_networking_secgroup_v2.sg
data.openstack_networking_subnet_v2.subnet
openstack_compute_instance_v2.vm[0]
openstack_compute_instance_v2.vm[1]
openstack_networking_port_v2.nic[0]
openstack_networking_port_v2.nic[1]
taint
간혹 어떤 이유에 의해서 리소스를 다시 만들고 싶을 때가 있습니다. 이 경우 taint를 사용할 수 있습니다.
openstack_compute_instance_v2.vm[1] 의 id 는 8da14215-4092-49aa-ab37-d88aa10a63b8 입니다. 이 리소스에 taint 적용 후 어떻게 변경이 되는지 확인해 보겠습니다.
$ terraform taint 'openstack_compute_instance_v2.vm[1]'
Resource instance openstack_compute_instance_v2.vm[1] has been marked as tainted.
plan을 해보면 replace 되었다고 알려줍니다.
$ terraform plan -var-file=foo.tfvars
...(생략)

  # openstack_compute_instance_v2.vm[1] is tainted, so must be replaced
-/+ resource "openstack_compute_instance_v2" "vm" {

(생략)
Plan: 1 to add, 0 to change, 1 to destroy.

───────────────────────────────────────────────────────────────────────────────────────────────────────────────────

Note: You didn't use the -out option to save this plan, so Terraform can't guarantee to take exactly these actions
if you run "terraform apply" now.
1개가 제거되고, 1개가 추가되는 방법으로 대체가 될 것이라 알려줍니다. apply를 실행해봅니다.
$ terraform apply -var-file=foo.tfvars
...(생략)

openstack_compute_instance_v2.vm[1]: Destroying... [id=8da14215-4092-49aa-ab37-d88aa10a63b8]
openstack_compute_instance_v2.vm[1]: Still destroying... [id=8da14215-4092-49aa-ab37-d88aa10a63b8, 10s elapsed]
openstack_compute_instance_v2.vm[1]: Destruction complete after 12s
openstack_compute_instance_v2.vm[1]: Creating...
openstack_compute_instance_v2.vm[1]: Still creating... [10s elapsed]
openstack_compute_instance_v2.vm[1]: Still creating... [20s elapsed]
openstack_compute_instance_v2.vm[1]: Still creating... [30s elapsed]
openstack_compute_instance_v2.vm[1]: Still creating... [40s elapsed]
openstack_compute_instance_v2.vm[1]: Still creating... [50s elapsed]
openstack_compute_instance_v2.vm[1]: Still creating... [1m0s elapsed]
openstack_compute_instance_v2.vm[1]: Creation complete after 1m6s [id=596e9b04-1a68-4e42-b401-e6cc7f78d4c8]

Apply complete! Resources: 1 added, 0 changed, 1 destroyed.
기존 인스턴스가 삭제되고 동일한 구성의 새로운 인스턴스가 기존의 Fixed IP는 유지한 채로 만들어졌습니다. uuid:596e9b04-1a68-4e42-b401-e6cc7f78d4c8
이처럼 모든 인프라의 변경이 state로 관리되기 때문에 서비스 단위 또는 역할 단위의 인프라를 쉽게 관리할 수 있는 점이 Terraform의 특징입니다.
인프라 제거
제거하는 방법은 tfvars의 내용을 변경하여 리소스를 제거하는 방법, destroy 명령으로 제거하는 방법 그리고 state rm 명령으로 리소스 단위를 명시적으로 제거하는 방법이 있습니다.
terraform destroy
state를 통해 관리되는 모든 리소스를 제거합니다.
$ terraform destroy -var-file=foo.tfvars
openstack_networking_port_v2.nic[0]: Refreshing state... [id=954a7a43-3454-4583-897d-e63a0ff7c1f9]
openstack_networking_port_v2.nic[1]: Refreshing state... [id=0610ad93-e5a9-4810-b94a-450e5086a531]
openstack_compute_instance_v2.vm[1]: Refreshing state... [id=596e9b04-1a68-4e42-b401-e6cc7f78d4c8]
openstack_compute_instance_v2.vm[0]: Refreshing state... [id=bceec37b-b5f3-481f-b5fb-d30767f824d8]

Terraform used the selected providers to generate the following execution plan.
Resource actions are indicated with the following symbols:
  - destroy

Terraform will perform the following actions:

  # openstack_compute_instance_v2.vm[0] will be destroyed
  - resource "openstack_compute_instance_v2" "vm" {
  ...(생략)

Plan: 0 to add, 0 to change, 4 to destroy.
tfvars 내용 편집
foo.tfvars 파일의 machines 변수의 값을 빈 list로 변경합니다.
machines = []
$ terraform plan -var-file=foo.tfvars
...(생략)
Plan: 0 to add, 0 to change, 4 to destroy.
terraform state rm
$ terraform state list
data.openstack_images_image_v2.img_debian10
data.openstack_networking_network_v2.vpc
data.openstack_networking_secgroup_v2.sg
data.openstack_networking_subnet_v2.subnet
openstack_compute_instance_v2.vm[0]
openstack_compute_instance_v2.vm[1]
openstack_networking_port_v2.nic[0]
openstack_networking_port_v2.nic[1]

$ terraform state rm -dry-run openstack_compute_instance_v2.vm

Would remove openstack_compute_instance_v2.vm[0]
Would remove openstack_compute_instance_v2.vm[1]
-dry-run 옵션으로 실제 삭제는 하지 않고 확인만 해볼 수도 있습니다.
그래프
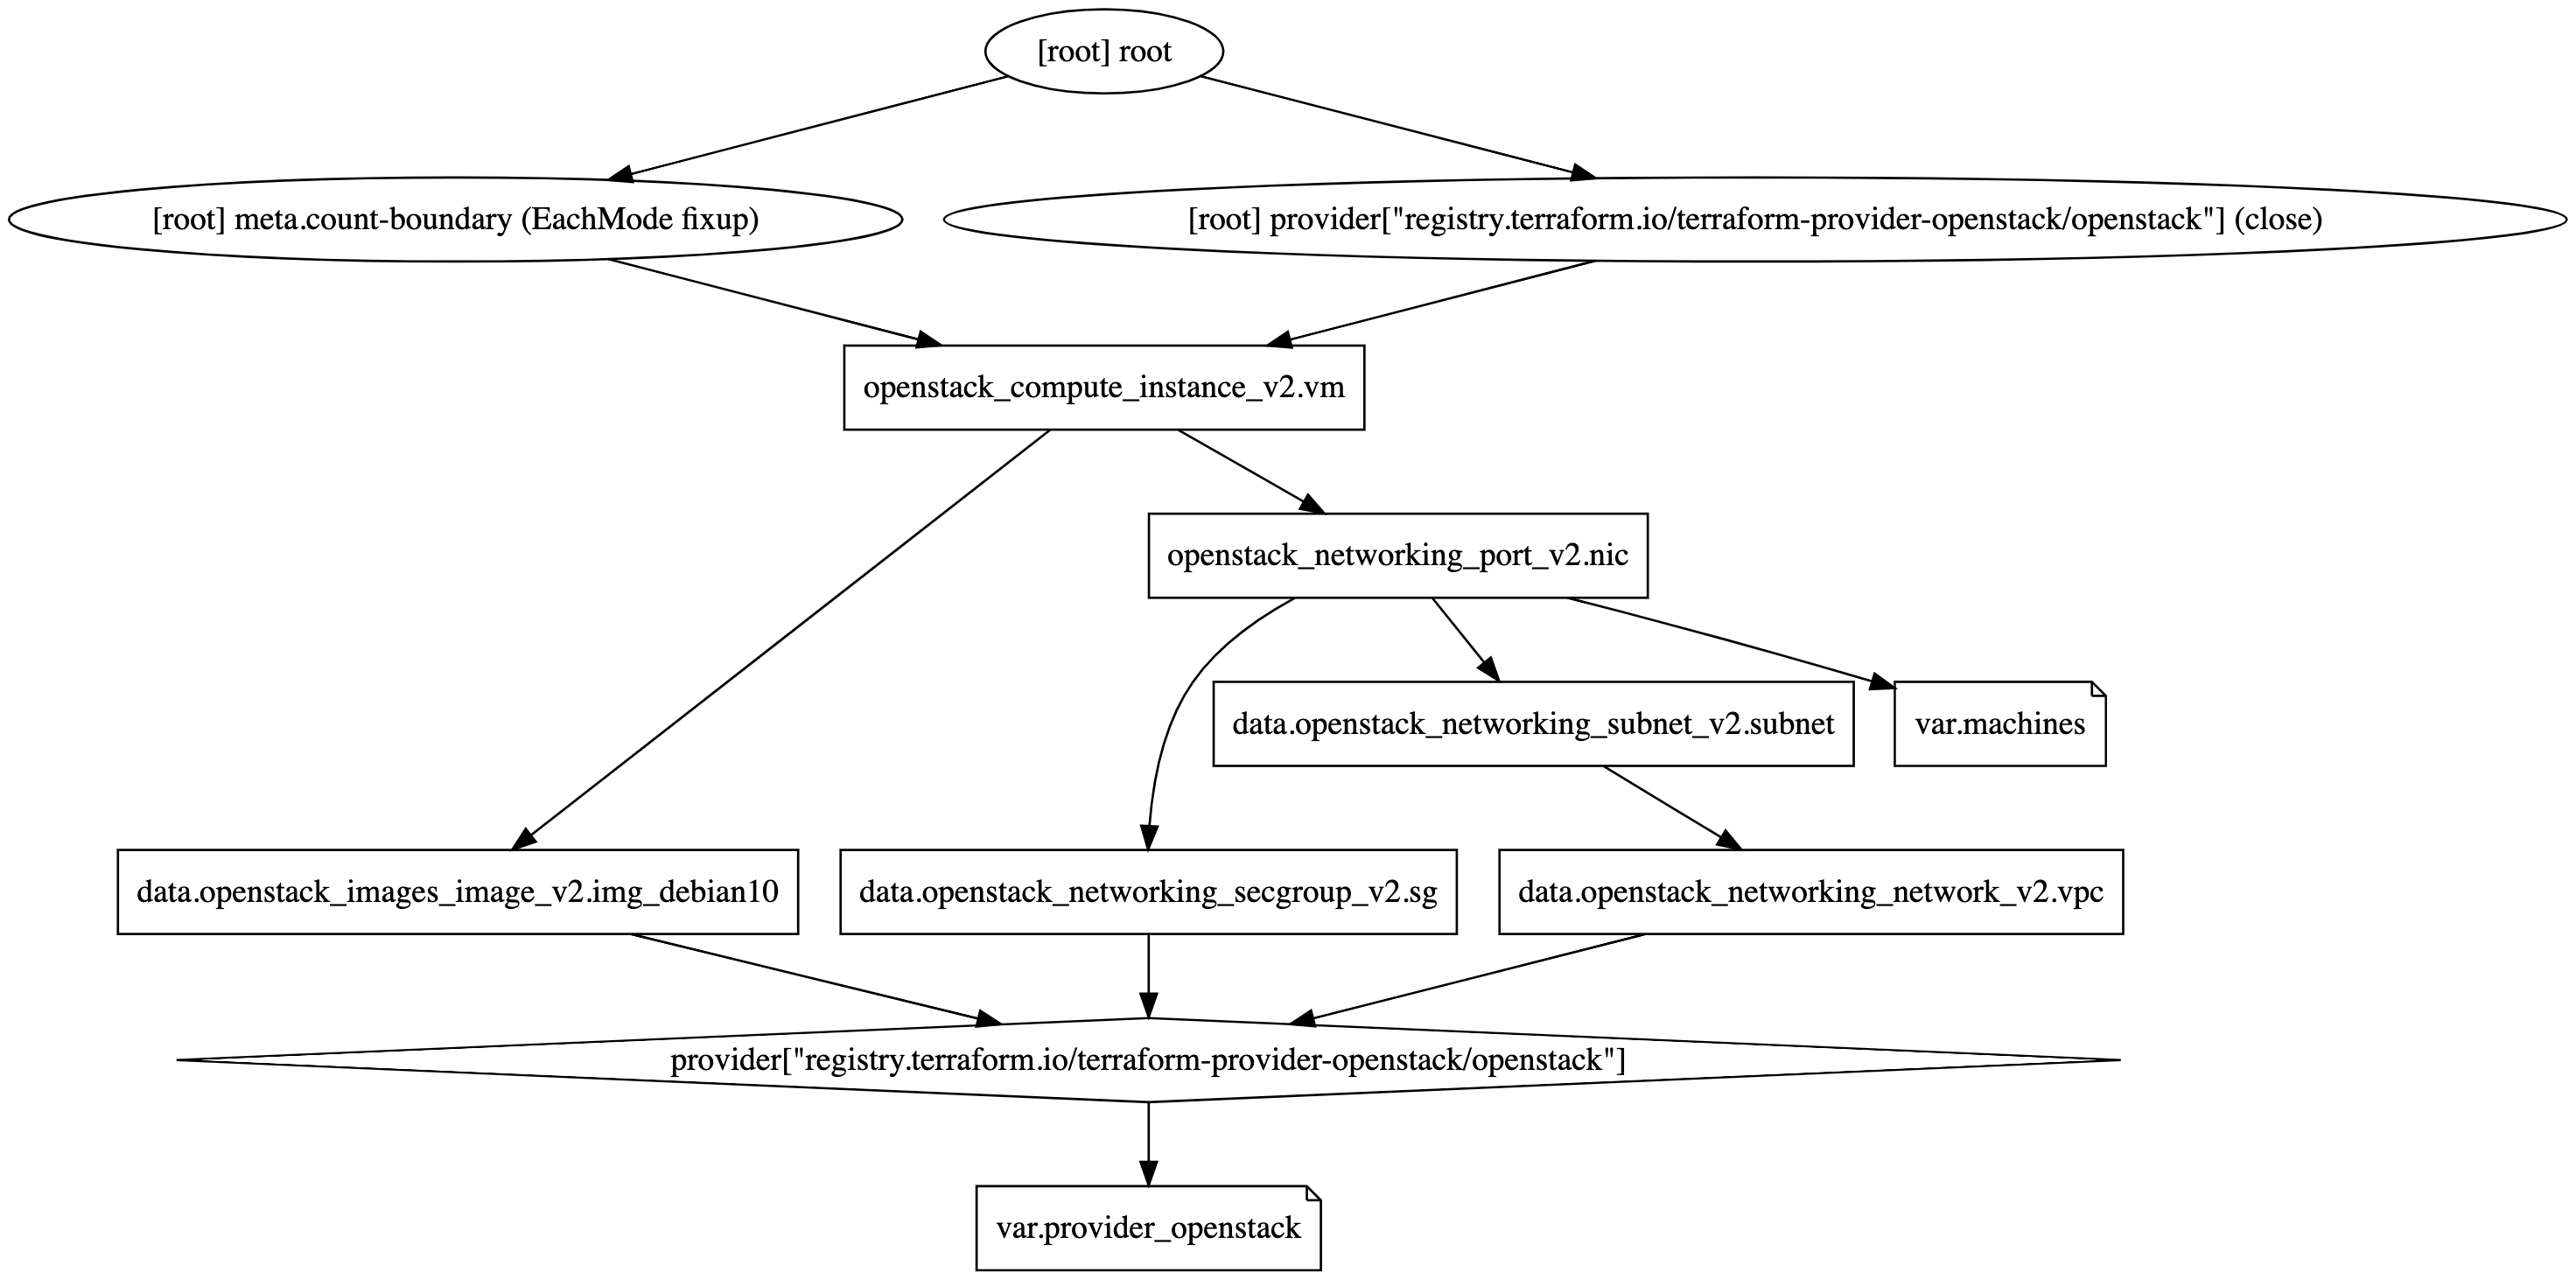
핵심 기능은 아니지만 알고 있으면 유용할 기능 중 하나로 그래프가 있습니다. plan, plan-destroy, apply, validate, input에 대해서 DOT 형식으로 그래프를 그려줍니다.
$ terraform graph
digraph {
	compound = "true"
	newrank = "true"
	subgraph "root" {
		"[root] data.openstack_images_image_v2.img_debian10 (expand)" [label = "data.openstack_images_image_v2.img_debian10", shape = "box"]
		"[root] data.openstack_networking_network_v2.vpc (expand)" [label = "data.openstack_networking_network_v2.vpc", shape = "box"]
		"[root] data.openstack_networking_secgroup_v2.sg (expand)" [label = "data.openstack_networking_secgroup_v2.sg", shape = "box"]
		"[root] data.openstack_networking_subnet_v2.subnet (expand)" [label = "data.openstack_networking_subnet_v2.subnet", shape = "box"]
		"[root] openstack_compute_instance_v2.vm (expand)" [label = "openstack_compute_instance_v2.vm", shape = "box"]
		"[root] openstack_networking_port_v2.nic (expand)" [label = "openstack_networking_port_v2.nic", shape = "box"]
		"[root] provider[\"registry.terraform.io/terraform-provider-openstack/openstack\"]" [label = "provider[\"registry.terraform.io/terraform-provider-openstack/openstack\"]", shape = "diamond"]
		"[root] var.machines" [label = "var.machines", shape = "note"]
		"[root] var.provider_openstack" [label = "var.provider_openstack", shape = "note"]
		"[root] data.openstack_images_image_v2.img_debian10 (expand)" -> "[root] provider[\"registry.terraform.io/terraform-provider-openstack/openstack\"]"
		"[root] data.openstack_networking_network_v2.vpc (expand)" -> "[root] provider[\"registry.terraform.io/terraform-provider-openstack/openstack\"]"
		"[root] data.openstack_networking_secgroup_v2.sg (expand)" -> "[root] provider[\"registry.terraform.io/terraform-provider-openstack/openstack\"]"
		"[root] data.openstack_networking_subnet_v2.subnet (expand)" -> "[root] data.openstack_networking_network_v2.vpc (expand)"
		"[root] meta.count-boundary (EachMode fixup)" -> "[root] openstack_compute_instance_v2.vm (expand)"
		"[root] openstack_compute_instance_v2.vm (expand)" -> "[root] data.openstack_images_image_v2.img_debian10 (expand)"
		"[root] openstack_compute_instance_v2.vm (expand)" -> "[root] openstack_networking_port_v2.nic (expand)"
		"[root] openstack_networking_port_v2.nic (expand)" -> "[root] data.openstack_networking_secgroup_v2.sg (expand)"
		"[root] openstack_networking_port_v2.nic (expand)" -> "[root] data.openstack_networking_subnet_v2.subnet (expand)"
		"[root] openstack_networking_port_v2.nic (expand)" -> "[root] var.machines"
		"[root] provider[\"registry.terraform.io/terraform-provider-openstack/openstack\"] (close)" -> "[root] openstack_compute_instance_v2.vm (expand)"
		"[root] provider[\"registry.terraform.io/terraform-provider-openstack/openstack\"]" -> "[root] var.provider_openstack"
		"[root] root" -> "[root] meta.count-boundary (EachMode fixup)"
		"[root] root" -> "[root] provider[\"registry.terraform.io/terraform-provider-openstack/openstack\"] (close)"
	}
}
결과물은 다음과 같습니다.
마치며
Terraform의 세세한 내용을 제외하고 핵심 내용만 간단히 소개를 해보았습니다. 인증정보 같은 중요한 정보는 plain text 가 아니라 Vault 같은 저장소를 연동하여 안전하게 숨길 수 있고 다양한 provider를 사용할 수 있기 때문에 현대의 Cloud native한 application을 지탱하는 인프라를 관리하기에 Terraform은 매력적인 도구라 생각됩니다.
AWS, GCP, Azure의 경우는 Terraform 튜토리얼이 있기에 OpenStack 기반의 NHN Cloud의 사례를 점점 늘려가길 바라는 마음에 글을 적어보았습니다.