Backend
spring-boot-starter 작성하기
2018년 5월 28일
원문에서 보기 ↗서론
spring-boot에서 starter란 의존성과 설정을 자동화해주는 모듈을 뜻한다.
예를 들어, spring-boot-starter-jpa를 의존성 추가했을 때 아래의 일을 해준다.
spring-aop,spring-jdbc등의 의존성을 걸어준다.classpath를 뒤져서 어떤 Database를 사용하는지 파악하고, 자동으로 entityManager를 구성해준다.- 해당 모듈들 설정에 필요한 properties 설정을 제공한다(
Configuration Processor를 사용하면 효과 UP)
프로젝트를 진행하면서, 공통적으로 사용되는 spring 설정을 모듈로 묶어놓고 사용할 수 있다. 또한 필요한 경우, 상위 프로젝트에서 얼마든지 설정을 덮어쓸 수 있다.
이번에는 직접 spring-boot-starter를 작성하고 동작하는 방법을 공유해보려 한다. spring-boot 버전은 2.0.0.RELEASE를 사용한다.
구현할 내용
아래 요구 사항을 충족하는 경우, reaquest parameter를 logging하는 spring-boot-starter를 작성한다.
application.yml에서spring.mvc.custom-uri-logging-filter.enabled: true일 것application.yml에서spring.mvc.custom-uri-logging-filter.level: info등으로 지정한 레벨로 찍을 것
구현
설명
sample-boot-starter 내부에 3개의 모듈을 생성한다.
sample-spring-boot-autoconfigure:@Configuration으로 특정 조건에 맞춰서 설정을 실행sample-spring-boot-starter-request-parameter-logging-filter:autoconfigure와 필요한 의존성을 가짐sample-spring-boot-starter-web:starter를 주입받음
autoconfigure와 starter를 굳이 나누지 않고, starter내에 autoconfigure를 정의해서 배포하는 경우도 있다.
Module Naming
starter를 만들 때는 설정을 담당하는 autoconfigure와 의존성을 담당하는 starter 모듈을 작성해야 한다. spring reference에서는 다음과 같이 모듈들의 명명 규칙을 정의하고 있다.
spring-boot로 시작하지 않을 것acme에 대한 starter를 만드는 경우autoconfigure:acme-spring-boot-autoconfigurestarter:acme-spring-boot-starter
spring의 경우를 보면 spring-boot-autoconfigure에서 모든 spring-boot-starter-XXX의 자동 설정 사항을 들고 있다. 이를 기반으로 spring-boot-starter-XXX(예: spring-boot-starter-jpa) 모듈에서는 의존성만 관리하고 있다.
저러한 규칙을 응용해서 {project}-spring-boot-configure, {project}-spring-boot-starter-{module}로 명명을 해도 괜찮다고 생각한다.
application property key
reference에서는 가능한 고유한 key를 사용할 것을 권고하고 있다. server, management, spring 등, spring이 이미 정의한 property key를 사용하는 경우, 향후 spring의 수정 내용이 어떠한 영향을 미칠지 알 수 없기 때문이다.
autoconfigure 모듈
autoconfigure 모듈은 자동 설정에 필요한 모든 요소(@ConfigurationProperties 등)와 library를 갖고 있다. autoconfigure에서 참조한 의존성에는 optional을 걸어두는 것이 좋다. 이 경우, autoconfigure를 참조하는 모듈에서 필요한 의존성이 없을 때, Spring Boot는 자동 설정을 하지 않는다.
구현
pom.xml
<?xml version="1.0" encoding="UTF-8"?>
<project xmlns:xsi="http://www.w3.org/2001/XMLSchema-instance" xmlns="http://maven.apache.org/POM/4.0.0"
         xsi:schemaLocation="http://maven.apache.org/POM/4.0.0 http://maven.apache.org/xsd/maven-4.0.0.xsd">
    <modelVersion>4.0.0</modelVersion>

    <groupId>com.parfait.study</groupId>
    <artifactId>sample-spring-boot-autoconfigure</artifactId>
    <version>0.0.1-SNAPSHOT</version>
    <packaging>jar</packaging>
    <name>sample-spring-boot-autoconfigure</name>

    <properties>
        <project.build.sourceEncoding>UTF-8</project.build.sourceEncoding>
        <project.reporting.outputEncoding>UTF-8</project.reporting.outputEncoding>
        <java.version>1.8</java.version>
        <maven.compiler.source>1.8</maven.compiler.source>
        <maven.compiler.target>1.8</maven.compiler.target>
        <spring-boot.version>2.0.0.RELEASE</spring-boot.version>
    </properties>

    <dependencies>
        <dependency>
            <groupId>org.springframework.boot</groupId>
            <artifactId>spring-boot-autoconfigure</artifactId>
        </dependency>

        <dependency>
            <groupId>org.springframework.boot</groupId>
            <artifactId>spring-boot-configuration-processor</artifactId>
            <optional>true</optional>
        </dependency>
        <dependency>
            <groupId>org.projectlombok</groupId>
            <artifactId>lombok</artifactId>
            <optional>true</optional>
        </dependency>
        <dependency>
            <groupId>org.slf4j</groupId>
            <artifactId>slf4j-api</artifactId>
            <optional>true</optional>
        </dependency>
        <dependency>
            <groupId>javax.servlet</groupId>
            <artifactId>javax.servlet-api</artifactId>
            <optional>true</optional>
        </dependency>
    </dependencies>

    <dependencyManagement>
        <dependencies> <!-- The parent should provide all that -->
            <dependency>
                <groupId>org.springframework.boot</groupId>
                <artifactId>spring-boot-dependencies</artifactId>
                <version>${spring-boot.version}</version>
                <type>pom</type>
                <scope>import</scope>
            </dependency>
        </dependencies>
    </dependencyManagement>
</project>
slf4j-api: log를 사용하기 위해 의존javax.servlet-api: Filter를 사용하기 위해 의존spring-boot-configuration-processor: IDE가application.yml의 내용을 가이드할 수 있도록 한다. 추후 상세 설명함.
application.yml
default 설정을 정의할 수 있다.
spring.mvc.request-parameter-logging-filter:
  enabled: true
  level: DEBUG
logging.level.com.parfait.study.autoconfigure.logging.filter.RequestParameterLoggingFilter: ${spring.mvc.request-parameter-logging-filter.level}
src/main/resoucres/META-INF/additional-spring-configuration-metadata.json
application.yml에서 설정한 key에 대한 정보를 정의할 수 있다. 이를 Configuration Metadata라 부르며, 이 파일을 정의한 경우 IDE에서 해당 키에 대한 가이드를 보여줄 수 있다. 가이드를 확인할 수 있는 화면은 추후 첨부하겠다. Configuration Metadata에 대해
{
  "properties": [
    {
      "name": "spring.mvc.request-parameter-logging-filter.enabled",
      "type": "org.slf4j.event.Level",
      "description": "true 또는 false"
    },
    {
      "name": "spring.mvc.request-parameter-logging-filter.level",
      "type": "java.lang.String",
      "description": "로깅 레벨 설정"
    }
  ]
}
RequestParameterLoggingFilterProperties
application.yml에서 작성한 키에 대응하는 Java class를 정의할 수 있다.
@ConfigurationProperties(prefix = "spring.mvc.request-parameter-logging-filter")
public class RequestParameterLoggingFilterProperties {
    private boolean enabled;
    private Level level;
    // getters and setters
}
RequestParameterLoggingFilter
실제 로직을 담당하는 필터를 정의한다.
@Slf4j
public class RequestParameterLoggingFilter implements Filter {

    @Override
    public void doFilter(ServletRequest request, ServletResponse response, FilterChain chain) throws IOException, ServletException {
        String params = request.getParameterMap()
                            .entrySet()
                            .stream()
                            .map(entry -> entry.getKey() + "=" + String.join(",", entry.getValue()))
                            .flatMap(Stream::of)
                            .collect(Collectors.joining("&"));
        log(params);
        chain.doFilter(request, response);
    }

    // private void log(String params) { ... }
}
SampleAutoConfiguration
재료(property, logic)이 다 모였으니, 이를 자동 설정이 되도록 해보자.
@Configuration
@AutoConfigureAfter(WebMvcAutoConfiguration.class) // 1
@EnableConfigurationProperties(RequestParameterLoggingFilterProperties.class) // 2
public class SampleAutoConfiguration {

    @Autowired
    private RequestParameterLoggingFilterProperties requestParameterLoggingFilterProperties;

    @Bean
    @ConditionalOnProperty(name = "spring.mvc.request-parameter-logging-filter.enabled", havingValue = "true") // 3
    public Filter customUriLoggingFilter() {
        return new RequestParameterLoggingFilter(requestParameterLoggingFilterProperties.getLevel());
    }
}
- Filter 설정(webmvc-specific)을 하는 것이기 때문에, webmvc 설정이 완료된 후에 해당 설정이 동작하게 만든다.
- RequestParameterLoggingFilterProperties를 bean으로 생성해
@Autowired가능하도록 만든다. @ConditionalOnXXX를 사용하여@Bean생성의 조건,@Configuration작동의 조건을 만들 수 있다.@Conditional(Condition condition)으로Condition인터페이스를 구현하여 더욱 상세하게 조건을 지정할 수도 있다.
src/main/resource/META-INF/spring.factories
.jar파일에 포함되어, 해당 boot 모듈이 설정해야 할 정보를 가지고 있다. org.springframework.boot.autoconfigure.EnableAutoConfiguration 키에 작성한 @Configuration class들을 콤마(,) 구분자로 넣어준다
org.springframework.boot.autoconfigure.EnableAutoConfiguration=com.parfait.study.autoconfigure.SampleAutoConfiguration
spring-boot-autoconfigure에서 사용되는 spring.factories
starter 모듈
필요한 설정 정보는 autoconfigure에서 모두 마쳤다. starter에서는 의존성만 걸어주면 된다. autoconfigure에서 optional을 제거하기만 하면 된다.
pom.xml
<?xml version="1.0" encoding="UTF-8"?>
<project xmlns="http://maven.apache.org/POM/4.0.0" xmlns:xsi="http://www.w3.org/2001/XMLSchema-instance"
         xsi:schemaLocation="http://maven.apache.org/POM/4.0.0 http://maven.apache.org/xsd/maven-4.0.0.xsd">
    <modelVersion>4.0.0</modelVersion>

    <groupId>com.parfait.study</groupId>
    <artifactId>sample-spring-boot-starter-request-parameter-logging-filter</artifactId>
    <version>0.0.1-SNAPSHOT</version>
    <packaging>jar</packaging>
    <name>sample-spring-boot-starter-request-parameter-logging-filter</name>

    <properties>
        <project.build.sourceEncoding>UTF-8</project.build.sourceEncoding>
        <project.reporting.outputEncoding>UTF-8</project.reporting.outputEncoding>
        <java.version>1.8</java.version>
        <maven.compiler.source>1.8</maven.compiler.source>
        <maven.compiler.target>1.8</maven.compiler.target>
        <spring-boot.version>2.0.0.RELEASE</spring-boot.version>
    </properties>

    <dependencies>
        <dependency>
            <groupId>com.parfait.study</groupId>
            <artifactId>sample-spring-boot-autoconfigure</artifactId>
            <version>0.0.1-SNAPSHOT</version>
        </dependency>
        <dependency>
            <groupId>org.slf4j</groupId>
            <artifactId>slf4j-api</artifactId>
        </dependency>
        <dependency>
            <groupId>javax.servlet</groupId>
            <artifactId>javax.servlet-api</artifactId>
        </dependency>
    </dependencies>

    <dependencyManagement>
        <dependencies> <!-- The parent should provide all that -->
            <dependency>
                <groupId>org.springframework.boot</groupId>
                <artifactId>spring-boot-dependencies</artifactId>
                <version>${spring-boot.version}</version>
                <type>pom</type>
                <scope>import</scope>
            </dependency>
        </dependencies>
    </dependencyManagement>
</project>
web 모듈
이제 설정한 starter를 써먹어보자. sample-spring-boot-starter-web이라는 이름이지만 그냥 웹 API Application이다.
pom.xml
<?xml version="1.0" encoding="UTF-8"?>
<project xmlns="http://maven.apache.org/POM/4.0.0" xmlns:xsi="http://www.w3.org/2001/XMLSchema-instance"
         xsi:schemaLocation="http://maven.apache.org/POM/4.0.0 http://maven.apache.org/xsd/maven-4.0.0.xsd">
    <modelVersion>4.0.0</modelVersion>

    <groupId>com.parfait.study</groupId>
    <artifactId>sample-spring-boot-starter-web</artifactId>
    <version>0.0.1-SNAPSHOT</version>
    <packaging>jar</packaging>
    <name>sample-spring-boot-starter-web</name>

    <parent>
        <groupId>org.springframework.boot</groupId>
        <artifactId>spring-boot-starter-parent</artifactId>
        <version>2.0.0.RELEASE</version>
        <relativePath/> <!-- lookup parent from repository -->
    </parent>

    <properties>
        <project.build.sourceEncoding>UTF-8</project.build.sourceEncoding>
        <project.reporting.outputEncoding>UTF-8</project.reporting.outputEncoding>
        <java.version>1.8</java.version>
    </properties>

    <dependencies>
        <dependency>
            <groupId>org.springframework.boot</groupId>
            <artifactId>spring-boot-starter-web</artifactId>
        </dependency>
        <!-- starter 의존성 설정 -->
        <dependency>
            <groupId>com.parfait.study</groupId>
            <artifactId>sample-spring-boot-starter-request-parameter-logging-filter</artifactId>
            <version>0.0.1-SNAPSHOT</version>
        </dependency>
    </dependencies>

    <build>
        <plugins>
            <plugin>
                <groupId>org.springframework.boot</groupId>
                <artifactId>spring-boot-maven-plugin</artifactId>
            </plugin>
        </plugins>
    </build>
</project>
UserController
@RestController
@RequestMapping("/users")
public class UserController {

    @GetMapping("/{id}")
    public String get(@PathVariable Long id) {
        return new RestTemplate().getForObject("https://jsonplaceholder.typicode.com/users/{id}", String.class, id);
    }
}
application.yml
드디어 보여줄 수 있게 되었다. src/main/resoucres/META-INF/additional-spring-configuration-metadata.json에서 말했던 IDE의 가이드란 이런 것이다.
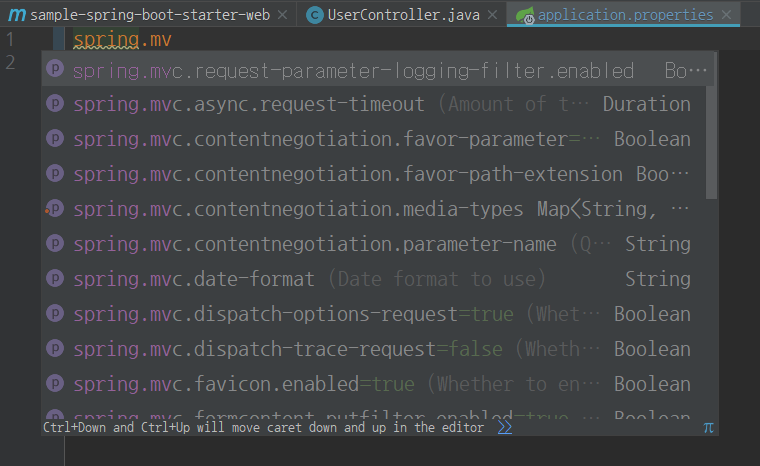
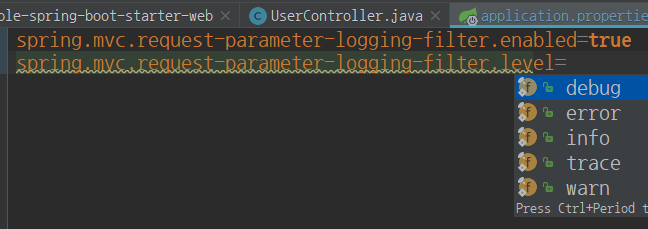
값 타입을 해석해서 후보까지 보여주는 위엄!
spring.mvc.request-parameter-logging-filter.enabled=true
spring.mvc.request-parameter-logging-filter.level=info
autoconfigure에서 작성한appliaction.yml값이 default이다.autoconfigure에서도 기본값을 지정하지 않고, Configuration Meta만 넘길 수도 있다.
실행 결과
이제 서버를 띄우고 API를 실행해보자. 사용하는 소스에서는 application.yml 외에는 아무런 설정을 하지 않았는데 Filter가 잘 동작하는 것을 확인할 수 있다.
GET /users/1?name=hello
2018-03-15 21:24:20.656 INFO 16048 --- [nio-8080-exec-1] .p.s.a.l.f.RequestParameterLoggingFilter : uri : name=hello
이 외에 할 수 있는 일들에 대해
spring-boot-starter는 협업에 있어서 강력한 자동 설정을 지원해 줄 수 있다는 점에서 매우 권장한다. boot를 사용하는 팀 간의 지원을 아주 간편하게 해줄 수 있다.
예를 들어, 빅데이터 분석을 위해 정보를 수집해야 하는 서비스에서는 bigdata-spring-boot-starter-log를 제공하여 아래와 같은 설정만으로 로그 수집 로직이 동작하게 하거나
bigdata.log:
  enable: true
  server: http://bigdata.server.com
  service.name: ABC Portal
혹은 회원 암호화 토큰을 cookie나 header로 받은 후, 회원 서버와 통신하고 그 결과를 request의 attribute에 주입해주는 경우, 아래와 같은 설정만으로 할 수도 있다.
member-server:
  enabled: true
  request:
    token:
      # or HEADER
      type: COOKIE
      name: MEMBER_TOKEN
    read-timeout: 2000
    connect-timeout: 1000
  result.attribute-name: RESOLVER_MEMBER_INFO
필터 말고 다른 예를 들어보자. spring의 Cache Abstraction을 이용해서 @Cacheable을 Near Cache로 구성할 수도 있다.
chained-cache-namager:
  bean-name: cacheManager
  local:
    type: EHCACHE
    config: classpath:/ehcache.xml
  global:
    type: REDIS
    cluster.hosts:
      - 10.0.0.1:6379
      - 10.0.0.2:6379
마무리
spring-boot로 인해 설정이 간편화되면서, 개발자는 좀 더 핵심 logic에 신경 쓸 수 있게 되었다. 예전에는 상위 pom.xml에서 의존성 관리하랴, 개발 프로젝트에서는 일일이 설정하랴, 한 번 프로젝트를 생성할 때마다 다시 한 번 반복하는 일들이 많았지만, 이제는 정해진 규모의 팀에서 정해진 관례로 아주 간편하게 설정을 간소화할 수 있다.
협업하는 부서에서 boot를 쓴다면, 살며시 starter를 건네보자.