Engineering
Proxy 모드 로드밸런서 이용시 클라이언트 IP 로깅하기(TOAST 서비스 들여다보기)
2018년 8월 31일
원문에서 보기 ↗로드밸런서란?
기본적으로 LB는 외부로 부터 들어온 요청에 대해 내부에 있는 서버들로 부하를 분산하는 용도로 사용이 됩니다. 자체적으로 내부에 있는 서버들의 상태를 체크해서, 서비스가 불가능한 서버로는 트래픽을 보내지 않는, 헬스체크 기능을 지원하기 때문에 부하 분산 뿐 아니라 HA 용도로도 많이 이용하는 인프라 솔루션입니다.
요청 흐름
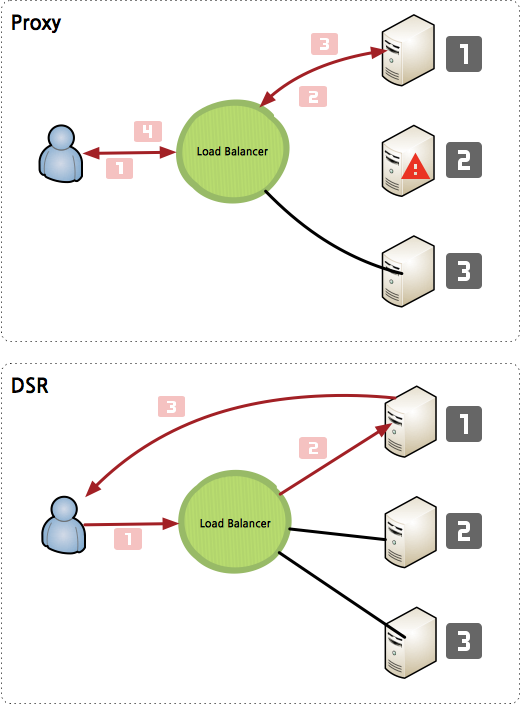
외부로 부터 들어온 요청은 크게 DSR(Direct Server Return)과 Proxy 두가지 모드의 트래픽 흐름을 가질 수 있습니다. DSR의 경우 아래 그림과 같이 사용자로 부터 온 요청에 대해 서버가 직접 응답을 주게 되며, Proxy 모드의 경우 LB를 통해 응답을 주게 됩니다. DSR 모드는 로드밸런서를 통해 응답을 주는 형태가가 아니기 때문에 로드밸런서에 부하를 덜 주게 되며, 응답이 서버에서 바로 나가는 특성으로 인해 Proxy 방식에 비해 좀 더 빠른 응답 latency를 가질 수 있다는 장점이 있습니다. 하지만 DSR을 이용하기 위해, 모든 서버에 loopback 형태의 설정을 추가해줘야 하는 불편함이 있습니다.
TOAST 를 포함한 대부분의 Cloud 업체에서 제공하는 로드밸런서는 Proxy 모드의 요청 흐름을 제공합니다.
X-Forwarded-For
Proxy 모드로 로드밸런서가 동작하기 위해 클라이언트는 로드 밸런서와 연결을 맺고, 로드밸런서는 서버로 커넥션을 맺는 형태가 됩니다. 이때 Source IP를 로드밸런서의 IP로 변경해서 서버로 요청하게 됩니다. 이 경우 서버에서는 실제 클라이언트의 IP를 알수 없기 때문에 요청자의 실제 IP를 로그에 남길 수 없게 됩니다. 이러한 이유로 HTTP/HTTPS에서는 X-Forwarded-For 헤더를 이용해 클라이언트의 IP를 알아낼 수 있는 방법을 제공합니다.
TOAST 로드밸런서는 Proxy 모드의 요청 흐름을 제공하며 모드 HTTP 요청에 대해 X-Forwarded-For 헤더를 추가해서 서버로 넘겨줍니다.
X-Forwarded-For 헤더는 client, proxy ip가 순서대로 기록 됩니다
X-Forwarded-For: client ip, proxy ip
웹서버의 log에 클라이언트 IP 남기기
위에서 설명한 X-Forwarded-For 헤더를 이용해 Apache, nginx의 로그에 클라이언트 IP를 기록할 수 있는 방법에 대해 설명합니다.
Apache
Apache 웹서버의 경우 기본 로그 설정은 아래와 같습니다.
LogFormat "%h %l %u %t \"%r\" %>s %b \"%{Referer}i\" \"%{User-Agent}i\"" combined
CustomLog logs/access_log combined
이 경우 클라이언트의 IP가 정상적으로 로그에 기록되지 않기 때문에 아래와 같은 형태로 변경이 필요합니다.
LogFormat "%h %l %u %t \"%r\" %>s %b \"%{Referer}i\" \"%{User-Agent}i\"" combined
LogFormat "%{X-Forwarded-For}i %l %u %t \"%r\" %>s %b \"%{Referer}i\" \"%{User-Agent}i\"" proxy
CustomLog logs/access_log proxy
설정 변경 이후 아파치 웹서버를 재시작하시면 적용된 로그를 확인할 수 있습니다.
nginx
nginx 에서 X-Forwarded-For 헤더를 이용하기 위해서, --with-http_realip_module 이 함께 컴파일 된 바이너리가 필요합니다. 기본적으로 --with-http_realip_module 모듈은 함께 사용할 수 있도록 설치가 됩니다. 해당 모듈이 설치되었는지 여부는 nginx -V 를 통해 확인하실 수 있습니다.
[root@host-192-168-0-88 ~]# nginx -V
nginx version: nginx/1.10.2
built by gcc 4.4.7 20120313 (Red Hat 4.4.7-17) (GCC)
built with OpenSSL 1.0.1e-fips 11 Feb 2013
TLS SNI support enabled
configure arguments: --prefix=/usr/share/nginx --sbin-path=/usr/sbin/nginx --modules-path=/usr/lib64/nginx/modules --conf-path=/etc/nginx/nginx.conf --error-log-path=/var/log/nginx/error.log --http-log-path=/var/log/nginx/access.log --http-client-body-temp-path=/var/lib/nginx/tmp/client_body --http-proxy-temp-path=/var/lib/nginx/tmp/proxy --http-fastcgi-temp-path=/var/lib/nginx/tmp/fastcgi --http-uwsgi-temp-path=/var/lib/nginx/tmp/uwsgi --http-scgi-temp-path=/var/lib/nginx/tmp/scgi --pid-path=/var/run/nginx.pid --lock-path=/var/lock/subsys/nginx --user=nginx --group=nginx --with-file-aio --with-ipv6 --with-http_ssl_module --with-http_v2_module --with-http_realip_module --with-http_addition_module --with-http_xslt_module=dynamic --with-http_image_filter_module=dynamic --with-http_geoip_module=dynamic --with-http_sub_module --with-http_dav_module --with-http_flv_module --with-http_mp4_module --with-http_gunzip_module --with-http_gzip_static_module --with-http_random_index_module --with-http_secure_link_module --with-http_degradation_module --with-http_slice_module --with-http_stub_status_module --with-http_perl_module=dynamic --with-mail=dynamic --with-mail_ssl_module --with-pcre --with-pcre-jit --with-stream=dynamic --with-stream_ssl_module --with-debug --with-cc-opt='-O2 -g -pipe -Wall -Wp,-D_FORTIFY_SOURCE=2 -fexceptions -fstack-protector --param=ssp-buffer-size=4 -m64 -mtune=generic' --with-ld-opt=' -Wl,-E'
설치가 되어 있다면, /etc/nginx/nginx.conf 를 열어 http 섹션에 $http_x_forwarded_for 가 포함되어 있는 것을 확인해 보시고, 없다면 추가해 주시면 됩니다.
log_format  main  '$remote_addr - $remote_user [$time_local] "$request" '
                  '$status $body_bytes_sent "$http_referer" '
                  '"$http_user_agent" "$http_x_forwarded_for"';

access_log  /var/log/nginx/access.log  main;