Engineering
Spring에서 요청에 따른 부가 응답 추가하기 (1)
2018년 4월 16일
원문에서 보기 ↗개요
최근 들어 특정 콘텐츠에 부가 속성을 더하여 보여주는 UI가 증가하고 있다. 부가 속성의 예를 들자면 좋아요, 싫어요, 댓글, 공유 링크, 연관 게시물, 추천 게시물 등을 들 수 있다. 이러한 부가 속성들은 기획적 요구나 성능 이슈로 인하여 클라이언트마다 다른 UI를 보여줘야할 때가 있다. 웹 서버 개발자로써 자주 겪게되는 요구 사항 중 하나다. 이러한 요구 사항을 Java와 Spring Framework를 이용해서 어떻게 하면 OOP스럽게 풀어나갈 수 있을까. 당면 과제 해결과 리팩토링을 거쳐 조금씩 더 나은 애플리케이션을 만들어보고자 한다.
요구 사항 정리
- 게시판 상세 API
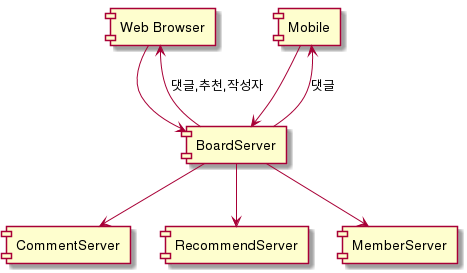
- Web에서는 댓글과 추천 게시글 목록을 보여줘야 함
- Mobile에서는 댓글만 보여줘야 함
서비스 구조
실제 도메인인 Board를 서비스하는 MicroService가 있고, 댓글, 회원 등의 다른 MicroService로 분리가 되어있다. BoardService는 자체로 하나의 서비스이자, 부가 속성들을 조합(API Ochestration)하는 역할을 한다.
해결법에 대한 생각
// 난 오늘만 사는 개발자(눈누난나~)
if (resolveDevice(request) == Device.APP) {
  // ...
} else {
  // ...
}
if가 좋은 점이 있다. 이해하기 쉽다는 점이다. 하지만 위의 예제는 OCP를 지킬 수 없다. 시간이 촉박하다면 당장에 if를 쓰고 싶은 마음이 들겠지만, 미래를 생각하여 접어두자.
원칙
특정 클라이언트에서는 특정 부가 정보들이 보이게 해달라는 요구 사항들은 앞으로도 추가될 수 있다. 좋은 설계를 통해 앞으로의 대비, 로직을 추가할 때의 비용을 줄이도록 하자.
- 가능한 OOP스럽게 : 작은 class들이 서로 협력하여 큰 문제를 해결하도록!
- 마치 장식(decoration)을 추가하는 것처럼 동작을 할 수 있으면 좋겠다.
- client가 필요한 부가 정보를 요청하도록 구현하자.
한 번 정해진 설계를 수정할 필요 없이 확장 가능하게
예상되는 API 형식
- client가 필요한 부가 정보를 요청하도록 구현하자.
기본
Board는 id, title, content 속성을 가지고 있다.
GET /boards/1
{
  "id": 1,
  "title": "title1",
  "content": "content1"
}
댓글추가
클라이언트가 댓글(comments)을 추가 정보로 요청할 수 있다.
GET /boards/1?attachment=comments
{
    "id": 1,
    "title": "title1",
    "content": "content1",
    "comments": [{
        "id": 1,
        "email": "Eliseo@gardner.biz",
        "body": "laudantium enim quasi est quidem magnam voluptate ipsam eos\ntempora quo necessitatibus\ndolor quam autem quasi\nreiciendis et nam sapiente accusantium"
    }]
}
댓글과 작성자정보
클라이언트가 댓글과 작성자정보(writer)를 추가 정보로 요청할 수 있다.
GET /boards/1?attachment=comments,writer
{
    "id": 1,
    "title": "title1",
    "content": "content1",
    "comments": [{
        "id": 1,
        "email": "Eliseo@gardner.biz",
        "body": "laudantium enim quasi est quidem magnam voluptate ipsam eos\ntempora quo necessitatibus\ndolor quam autem quasi\nreiciendis et nam sapiente accusantium"
    }],
    "writer": {
        "id": 1,
        "username": "Bret"
    }
}
기본 API 작성
천리 길도 한걸음부터다. 우선은 기본 API를 작성하자. 기본 API 작성에 관한 내용은 별다른 설명 없이 소스로 대체하고자 한다.
web 모듈 생성
의존성 설정
현재일(2018-03-10) 기준으로 최신 버전인 spring-boot 2.0.0.RELAESE 사용했다
dependencies {
  compile('org.springframework.boot:spring-boot-starter-data-jpa')
  compile('org.springframework.boot:spring-boot-starter-web')
  compileOnly('org.projectlombok:lombok')
  runtime('com.h2database:h2')
}
Entity
@Data
@NoArgsConstructor(access = AccessLevel.PRIVATE)
@Table(name = "board")
@Entity
public class Board {
    @Id
    @GeneratedValue
    private Long id;
    private String title;
    private String content;

    public Board(@NonNull String title, @NonNull String content) {
        this.title = title;
        this.content = content;
    }
}
Controller
@RestController
@RequestMapping("/boards")
public class BoardController {
    @Autowired
    private final BoardRepository boardRepository;

    @GetMapping("/{id}")
    public Board getOne(@PathVariable("id") Board board) {
        return board;
    }
}
미리 데이터 넣어두기
@SpringBootApplication
public class SimpleAttachmentApplication implements CommandLineRunner {

    @Autowired
    private BoardRepository boardRepository;

    public static void main(String[] args) {
        SpringApplication.run(SimpleAttachmentApplication.class, args);
    }

    @Override
    public void run(String... args) throws Exception {

        boardRepository.save(new Board("title1", "content1"));
        boardRepository.save(new Board("title2", "content2"));
        boardRepository.save(new Board("title3", "content3"));
    }
}
서버띄워 실행
GET /borads/1
{
  "id": 1,
  "title": "title1",
  "content": "content1"
}
소스 : https://github.com/supawer0728/simple-attachment/tree/base-api
기본 API에 attachment 구현하기
attachment를 구현하기 위한 사항들을 Spring의 MVC 요청을 처리하는 흐름에 따라 정리해보았다.
- 필요한 경우 Interceptor에서
attachment를 해석하고 저장한다 1-1 필요한 경우가 언젠지 정의해야 함. 1-2attachment를 해석할 class를 정의해야 함(AttachmentType) attachment는Request Scopebean에 담아두고, 필요할 때 꺼내 사용(AttachmentTypeHolder class 정의)- Controller에서 객체가 반환되면, 필요한 속성을 추가 3-1 Controller의 로직은 변경하지 않음 3-2 AOP를 통해서,
1-1의필요한 경우를 파악하여, attachment를 위한 서비스 로직을 실행 3-3Board엔티티는 생성, 수정, 삭제 용도로 남겨두고, 읽기 요청에 대해서는 comments, writer 등을 추가할 수 있는 BoardDto로 변환해서 보내자.(CQRS 적용)
attachment를 해석해서 저장하기
AttachmentType
서버에서 정의한 값들만 attachment로 해석할 것이다. enum이 안성맞춤일 것 같다. enum으로 AttachmentType을 정의하자.
public enum AttachmentType {
    COMMENTS;
}
AttachmentTypeHolder
요청에서 해석한 attachment를 저장할 @RequestScope bean이 필요하다. AttachmentTypeHolder에 요청된 attachment의 내용을 담아둘 것이다.
@RequestScope
@Component
@Data
public class AttachmentTypeHolder {
    private Set<AttachmentType> types;
}
@Attach
어떤 경우에 attachment를 해석할 것이지를 정의해야 한다. 실행하고자 하는 Controller의 메서드에 @Attach가 있으면, 해석이 필요한 경우로 정의했다.
@Target({ElementType.METHOD})
@Retention(RetentionPolicy.RUNTIME)
public @interface Attach {
}

@RestController
@RequestMapping("/boards")
public class BoardController {

    // `/boards/{id}`로 요청이 들어오면 요청에 있는 attachment를 해석하려 할 것이다.
    @Attach
    @GetMapping("/{id}")
    public BoardDto getOne(@PathVariable("id") Board board) { return board;}
}
AttachInterceptor
이제 요청에서 attachment를 해석해서 AttachmentTypeHolder에 저장하자. 편의상 성능 관련 로직은 배제했다.
@Component
public class AttachInterceptor extends HandlerInterceptorAdapter {

    public static final String TARGET_PARAMETER_NAME = "attachment";
    @Autowired
    private AttachmentTypeHolder attachmentTypeHolder;

    @Override
    public boolean preHandle(HttpServletRequest request, HttpServletResponse response, Object handler) throws Exception {

        if (!(handler instanceof HandlerMethod)) {
            return true;
        }

        HandlerMethod handlerMethod = (HandlerMethod) handler;
        // hasMethodAnnotation()의 호출 스택이 꽤 길어서, Map<HandlerMethod, Boolean>으로 캐싱하시면 살짝 성능이 좋아짐
        if (!key.hasMethodAnnotation(Attachable.class)) {
            return true;
        }

        Set<AttachmentType> types = resolveAttachmentType(request);
        attachmentTypeHolder.setTypes(types);

        return true;
    }

    private Set<AttachmentType> resolveAttachmentType(HttpServletRequest request) {
        String attachments = request.getParameter(TARGET_PARAMETER_NAME);

        if (StringUtils.isBlank(attachments)) {
            return Collections.emptySet();
        }

        // 기본적으로 enum의 valueOf는 찾는 값이 없을 시 IllegalArgumentException을 throw
        // attachment 때문에 장애가 나면 넌센스, 실제로 구현할 때에는 exception을 던지지 않게 해야함
        // github 소스에서는 exception을 던지지 않음
        return Stream.of(attachments.split(","))
                     .map(String::toUpperCase)
                     .map(AttachmentType::valueOf)
                     .collect(Collectors.toSet());
    }
}
Test
앞서 정의한 인터셉터가 잘 동작하는 지 확인해보자.
public class AttachInterceptorTest {

    @InjectMocks
    private AttachInterceptor attachInterceptor;
    @Spy
    private AttachmentTypeHolder attachmentTypeHolder;
    @Mock
    private HandlerMethod handlerMethod;

    @Before
    public void setUp() throws Exception {
        MockitoAnnotations.initMocks(this);
    }

    @Test
    public void preHandle() throws Exception {
        // given
        given(handlerMethod.hasMethodAnnotation(Attachable.class)).willReturn(true);
        MockHttpServletRequest request = new MockHttpServletRequest();
        request.setParameter(AttachInterceptor.TARGET_PARAMETER_NAME, AttachmentType.COMMENTS.name().toLowerCase());
        MockHttpServletResponse response = new MockHttpServletResponse();

        // when
        attachInterceptor.preHandle(request, response, handlerMethod);

        // then
        assertThat(attachmentTypeHolder.getTypes(), hasItem(AttachmentType.COMMENTS));
    }
}
소스 : https://github.com/supawer0728/simple-attachment/tree/save-attachment-request
Controller에서 BoardDto를 반환하게 만들기
BoardDto 정의
앞에서 정의했던 Board는 엔티티이다. 엔티티는 생성, 수정시 사용하도록 두고, 부가 정보인 댓글, 추천정보를 담을 모델을 BoardDto로 정의해서 응답을 주자.
@Data
@JsonInclude(JsonInclude.Include.NON_NULL)
public class BoardDto {
    private Long id;
    private String title;
    private String content;

    @Setter(AccessLevel.PRIVATE)
    @JsonIgnore
    private Map<AttachmentType, Attachment> attachmentMap = new EnumMap<>(AttachmentType.class);
}
위에서는 왜 attachmentMap을 썼을까? 만약 attachmentMap이 없었다면 아래와 같이 각각 다른 멤버로 선언이 되었을 것이고, 이는 아래와 같이 소스를 attach할 모델이 추가될 때, 소스를 수정하게 만드는 원인이 된다.
public class BoardDto {
  ...
  List<CommentDto> comments;
  Writer writer;
  // 추후에 추천목록이 생긴다면 List<RecommendationDto> recommendations;가 추가됨
}
Map을 가져다 쓰는게 마음에 들지 않는다거나, 별도의 클래스를 정의해서 쓰고 싶다면, AttachmentWrapper 등의 클래스를 정의해서 Map을 래핑하고 delegate 패턴을 구현한 클래스를 사용할 수도 있다. lombok의 @Delegate는 이런 경우 편리하게 사용할 수 있다.
public class AttachmentWrapper {

    interface AttachmentMap {
        void put(AttachmentType type, Attachment attachment);
        void putAll(Map<? extends AttachmentType, ? extends Attachment> attachmentMap);
        boolean isEmpty();
        Set<Map.Entry<AttachmentType, Attachment>> entrySet();
    }

    @Delegate(types = AttachmentMap.class)
    private Map<AttachmentType, Attachment> value = new EnumMap<>(AttachmentType.class);
}
BoardDto에 적용하자.
@Data
@JsonInclude(JsonInclude.Include.NON_NULL)
public class BoardDto implements Attachable {
    private Long id;
    private String title;
    private String content;

    @Setter(AccessLevel.PRIVATE)
    @JsonIgnore
    private AttachmentWrapper attachmentWrapper = new AttachmentWrapper();
}
Attcahment
부가 정보 클래스를 나타내기 위한 마크 인터페이스가 있으면 좋겠다. Attachment라고 이름을 짓자.
public interface Attachment {}
부가 정보, 예를 들어 댓글 DTO를 정의한다면 다음과 같이 선언하게 된다.
@Data
public class CommentDto implements Attachment {
    private Long id;
    private String email;
    private String body;
}
Attachment의 내용물은 Collection의 자료구조가 될 수도 있다. 예를 들어, 댓글 목록을 추가할 수 있어야 한다. 그러기 위한 자료구조도 정의하자.
public interface AttachmentCollection<T extends Attachment> extends Attachment, Collection<T> {
    @JsonUnwrapped
    Collection<T> getValue();
}

@Value
public class SimpleAttachmentCollection<T extends Attachment> implements AttachmentCollection<T> {
    @Delegate
    private Collection<T> value;
}
Converter 정의
A 오브젝트를 B 오브젝트로 변환하는 것은 여러 방법이 있다. 별다른 모듈에 의존하지 않고, 간단히 spring의 converter를 구현해서 정의했다.
@Component
public class BoardDtoConverter implements Converter<Board, BoardDto> {

    @Override
    public BoardDto convert(@NonNull Board board) {
        BoardDto boardDto = new BoardDto();
        boardDto.setId(board.getId());
        boardDto.setTitle(board.getTitle());
        boardDto.setContent(board.getContent());
        return boardDto;
    }
}
Spring의 Converter를 구현한 것은 단순한 개인취향이다.
board.toDto()등의 메서드를 작성해서 변환해도 무관하나 Board와 BoardDto 사이에 결합도가 생기는 게 싫었다. 그 정도의 결합도를 용납할 수 있다면board.toDto()도 좋은 선택이다.
Controller의 반환값 수정
앞서 정의한 Converter를 주입받아, Board를 BoardDto로 변환 후 반환한다.
@RestController
@RequestMapping("/boards")
public class BoardController {

    @Autowired private BoardRepository boardRepository;
    @Autowired private BoardDtoConverter boardDtoConverter;

    @Attachable
    @GetMapping("/{id}")
    public BoardDto getOne(@PathVariable("id") Board board) {
        return boardDtoConverter.convert(board);
    }
}
AOP로 반환된 값에 모델 추가하기
AOP 사용 설정
@EnableAspectJAutoProxy(proxyTargetClass = true)
@SpringBootApplication
public class SimpleAttachmentApplication implements CommandLineRunner { ... }
AOP로 Advice 작성하기
@Attach가 있는 메서드를 pointcut으로 잡아 advice가 실행되도록 정의한다.
@Component
@Aspect
public class AttachmentAspect {

    @Autowired private final AttachmentTypeHolder attachmentTypeHolder;

    @Pointcut("@annotation(com.parfait.study.simpleattachment.attachment.Attach)")
    private void pointcut() { }

    @AfterReturning(pointcut = "pointcut()", returning = "returnValue")
    public Object afterReturning(Object returnValue) {

        if (attachmentTypeHolder.isEmpty() && !(returnValue instanceof Attachable)) {
            return returnValue;
        }

        executeAttach((Attachable) returnValue);

        return returnValue;
    }

    private void executeAttach(Attachable attachable) {
      // TODO : 로직 작성
    }
}
이제 1/2는 끝났다. 사실상 핵심로직인 저 TODO 안의 내용만 채우면 된다.
어떻게 모델을 추가할까?
우선은 BoardDto를 먼저 손을 봐야할 것 같다.
BoardDto에 CommentDto를 추가하기 위한 동작을 interface로 뽑아내자.
public interface Attachable {

    AttachmentWrapper getAttachmentWrapper();

    default void attach(AttachmentType type, Attachment attachment) {
        getAttachmentWrapper().put(type, attachment);
    }

    default void attach(Map<? extends AttachmentType, ? extends Attachment> attachment) {
        getAttachmentWrapper().putAll(attachment);
    }

    @JsonAnyGetter
    default Map<String, Object> getAttachment() {
        AttachmentWrapper wrapper = getAttachmentWrapper();

        if (wrapper.isEmpty()) {
            return null;
        }

        return wrapper.entrySet()
                      .stream()
                      .collect(Collectors.toMap(e -> e.getKey().lowerCaseName(), Map.Entry::getValue));
    }
}

@Data
@JsonInclude(JsonInclude.Include.NON_NULL)
public class BoardDto implements Attachable {
    private Long id;
    private String title;
    private String content;

    @Setter(AccessLevel.PRIVATE)
    @JsonIgnore
    private AttachmentWrapper attachmentWrapper = new AttachmentWrapper();
}
Attachable 인터페이스에 필요한 동작들을 default로 선언했기 때문에, BoardDto에는 별다른 수정을 할 필요가 없다. BoardDto에 댓글을 추가할 때에는 BoardDto.attach(AttachmentType.COMMENTS, new CommentsDto())를 호출하면 된다.
AttachService 정의
첨가 로직(attach)을 선언하고 실행할 AttachmentService가 있어야할 것 같다. AttachService가 가져야할 요건을 3가지로 나눌 수 있다.
- 어떤
AttachmentType에 대해 동작하는가? - 어떤 class에 대해 작업을 수행할 수 있는가?
- attachment를 가져옴(생성)
이를 interface로 뽑아내면 아래와 같이 선언할 수 있다.
public interface AttachService<T extends Attachable> {
    AttachmentType getSupportAttachmentType(); // 1. 어떤 AttachmentType에 대해서 동작하는가

    Class<T> getSupportType(); // 2. 어떤 Attachable 클래스에 대해 동작하는가

    /**
     * 형안전성을 지킬 것
     *
     * @param attachment
     * @throws ClassCastException
     */
    Attachement getAttachment(Object attachment); // 3. attachment를 가져옴
}
2번이 왜있지? 1번만 보고 댓글이 필요하면 추가하면 되는거 아냐? 라고 생각할 수 있을 것 같다. 하지만 댓글은 쪽지의 댓글이 있을 수도 있고, 뉴스의 댓글이 될 수도 있고, 동영상의 댓글이 될 수도 있다. 이러한 댓글들마다 불러오는 방법이 다를 수 있다. 즉 클래스 별로 다른 방식으로 불러와야 하는 것이다. 구현체가 어떤 객체에 대해서 attach를 실행할 수 있을지 조금더 상세히 정의하기 위해 Class<T> getSupportType()를 정의했다.
아래와 같이 AttachService의 구현체를 정의할 수 있다.
AttachCommentsToBoardService.java
CommentClient는 FeignClient를 사용했다.
@Component
public class AttachCommentsToBoardService implements AttachService<BoardDto> {

    private static final AttachmentType supportAttachmentType = AttachmentType.COMMENTS;
    private static final Class<BoardDto> supportType = BoardDto.class;
    private final CommentClient commentClient; // feign client 사용

    @Autowired
    public AttachCommentsToBoardService(@NonNull CommentClient commentClient) {
        this.commentClient = commentClient;
    }

    @Override
    public AttachmentType getSupportAttachmentType() {
        return supportAttachmentType;
    }

    @Override
    public Class<BoardDto> getSupportType() {
        return supportType;
    }

    @Override
    public Attachment getAttachment(Attachable attachment) {
        BoardDto boardDto = supportType.cast(attachment);
        return new SimpleAttachmentCollection<>(commentClient.getComments(boardDto.getId()));
    }
}
Advice 나머지 부분 작성하기
앞서 작성했던 AttachmentAspect의 //TODO 부분을 채울 차례다. List를 사용해서 spring에 등록된 모든 AttachService를 주입받아, AttachmentType과 Attachable의 타입으로 필터링해서 attach를 실행한다.
@Component
@Aspect
public class AttachmentAspect {

    private final AttachmentTypeHolder attachmentTypeHolder;
    private final Map<AttachmentType, List<AttachService<? extends Attachable>>> typeToServiceMap;

    // 생성자에서 모든 AttachService를 주입받아 지원하는 AttachmentType에 맞추어 `typeToServiceMap`에 저장
    @Autowired
    public AttachmentAspect(@NonNull AttachmentTypeHolder attachmentTypeHolder,
                            @NonNull List<AttachService<? extends Attachable>> attachService) {
        this.attachmentTypeHolder = attachmentTypeHolder;
        this.typeToServiceMap = attachService.stream()
                                             .collect(Collectors.groupingBy(AttachService::getSupportAttachmentType, Collectors.toList()));
    }

    @Pointcut("@annotation(com.parfait.study.simpleattachment.attachment.Attach)")
    private void pointcut() {
    }

    @AfterReturning(pointcut = "pointcut()", returning = "returnValue")
    public Object afterReturning(Object returnValue) {

        if (attachmentTypeHolder.isEmpty() && !(returnValue instanceof Attachable)) {
            return returnValue;
        }

        executeAttach((Attachable) returnValue);

        return returnValue;
    }

    private void executeAttach(Attachable attachable) {

        Set<AttachmentType> types = attachmentTypeHolder.getTypes();
        Class attachableClass = attachable.getClass();

        // Stream API를 사용해 손쉽게 필터링을 하고 알맞은 `AttachService.attach()`를 실행
        Map<AttachmentType, Attachment> attachmentMap =
                types.stream()
                     .flatMap(type -> typeToServiceMap.get(type).stream())
                     .filter(service -> service.getSupportType().isAssignableFrom(attachableClass))
                     .collect(Collectors.toMap(AttachService::getSupportAttachmentType, service -> service.getAttachment(attachable)));

        attachable.attach(attachmentMap);
    }
}
실행해보기
GET /boards/1?attachment=comments
{
   "id":1,
   "title":"title1",
   "content":"content1",
   "comments":[
      {
         "id":1,
         "email":"Eliseo@gardner.biz",
         "body":"laudantium enim quasi est quidem magnam voluptate ipsam eos\ntempora quo necessitatibus\ndolor quam autem quasi\nreiciendis et nam sapiente accusantium"
      }
   ]
}
소스 : https://github.com/supawer0728/simple-attachment/tree/attach-writer
Writer를 추가해보자
여태까지 장황한 소스를 작성했다. 한번 구조를 잡았으니 새로운 attachment를 추가하는 것은 어렵지 않다. 그러기 위해 설계를 하는 것이고, OOP를 하는 거니까.
AttachmentType 수정(WRITER 추가)
public enum AttachmentType {
    COMMENTS, WRITER;
    //...
}
WriterDto 추가
@Data
public class WriterDto implements Attachment {
    private Long id;
    private String username;
    private String email;
}
WriterClient 추가
@FeignClient(name = "writer-api", url = "https://jsonplaceholder.typicode.com")
public interface WriterClient {
    @GetMapping("/users/{id}")
    WriterDto getWriter(@PathVariable("id") long id);
}
AttachWriterToBoardService 추가
@Component
public class AttachWriterToBoardService implements AttachService<BoardDto> {

    private static final AttachmentType supportAttachmentType = AttachmentType.WRITER;
    private static final Class<BoardDto> supportType = BoardDto.class;
    private final WriterClient writerClient;

    @Autowired
    public AttachWriterToBoardService(@NonNull WriterClient writerClient) {
        this.writerClient = writerClient;
    }

    @Override
    public AttachmentType getSupportAttachmentType() {
        return supportAttachmentType;
    }

    @Override
    public Class<BoardDto> getSupportType() {
        return supportType;
    }

    @Override
    public Attachment getAttachment(Attachable attachment) {
        BoardDto boardDto = supportType.cast(attachment);
        return writerClient.getWriter(boardDto.getWriterId());
    }
}
기존의 소스를 수정하는 곳은 딱 한 군데다. enum에 WRITER를 추가했는데, 이것도 사실상 수정이 아니라 추가라고 볼 수 있지 않을까? Spring이 의존성 주입은 모두 담당하기 때문에 필요한 모델을 추가로 작성할 때는 어떻게 부가 정보를 가져올지, 어떻게 모델을 정의할지만 POJO로 잘 작성하면 된다.
실행
GET /boards/1?attachment=comments,writer
{
  "id": 1,
  "title": "title1",
  "content": "content1",
  "comments":[
    {
      "id": 1,
      "email": "Eliseo@gardner.biz",
      "body": "laudantium enim quasi est quidem magnam voluptate ipsam eos\ntempora quo necessitatibus\ndolor quam autem quasi\nreiciendis et nam sapiente accusantium"
    }
  ],
  "writer":{
    "id": 1,
    "username": "Bret",
    "email": "Sincere@april.biz"
  }
}
소스 : https://github.com/supawer0728/simple-attachment/tree/attach-writer
마무리
HTTP 요청에서 client가 원하는 모델을 추가하는 로직을 구성해보았다. 다음 글에서는 여기서 성능 튜닝을 위한 몇가지 로직을 추가하려고 한다. 현재 소스에는 엄청난 단점이 적어도 두 개나 존재하는데, 바로 AttachmentAspect에서 외부와 통신하여 Attachment를 가져오는 부분이다.
Map<AttachmentType, Attachment> attachmentMap =
        types.stream()
             .flatMap(type -> typeToServiceMap.get(type).stream())
             .filter(service -> service.getSupportType().isAssignableFrom(attachable.getClass()))
             .collect(Collectors.toMap(AttachService::getSupportAttachmentType, service -> service.getAttachment(attachable)));
이 부분이 왜 엄청난 단점인지 살펴보자.
- Network I/O를 순차 실행
- O(n) 시간이 걸린다 : timeout * attachment 개수
- Asynch로 O(1)만에 끝내도록 튜닝 필요하다
- Failover
attachment는 단순 부가 정보임에도 불구하고 attachmentService에서 exception이 발생하면, 아무 정보도 내려줄 수 없음attach는 실패해도Board정보와 나머지 성공한attachment는 보여줘야 한다
아래는 100번 writer가 없어서(404) 오류가 난 예제이다.
GET /boards/100?attachment=comments,writer
{
   "id":1,
   "title":"title1",
   "content":"content1",
   "comments":[
      {
         "id":1,
         "email":"Eliseo@gardner.biz",
         "body":"laudantium enim quasi est quidem magnam voluptate ipsam eos\ntempora quo necessitatibus\ndolor quam autem quasi\nreiciendis et nam sapiente accusantium"
      }
   ]
}
부가 정보인 댓글을 가져오려고 하는데 실패해서 중요한 게시글도 못 가져오면 좋은 설계라고 할 수 있을까? 다음번에는 위의 두 가지 단점을 중점으로 개선해나가려고 한다.